The new-project wizard
Ten steps that turn plain answers into a complete hull. Four of them are optional and have a Skip button. The preview panel on the right updates as you go — it is a real generated hull, floated against the load you specify.
1 — Boat type
"What kind of boat are you designing? Planing and displacement hulls are both available — multihull is on the way."
| Option | Status | |
|---|---|---|
| Planing hull | Fast V-bottom that rises and skims across the water. | Available |
| Displacement vessel | Steady round-bilge hull that pushes through the water. | Available |
| Multihull | Two or three slim hulls — catamaran or trimaran. | in development |
Multihull is shown rather than hidden so you can see where the product is going; it cannot be selected. Planing hull is chosen for you, so if that is what you are drawing this step is just Next. Choosing Displacement vessel changes the presets, the hull shape controls and the physics behind every number — see Displacement hulls below.
A displacement boat pushes water aside and is held up by buoyancy alone. Its top speed is effectively capped by the wave it makes: past a certain point, more power just digs a deeper hole.
A planing hull is shaped so that above a certain speed the water flowing under the flat-ish bottom generates lift, like a very inefficient wing. The boat climbs partly out of the water, its wetted length shrinks, and drag stops rising the way it did. That transition is what the planing side of the app is built around — and it is why such a hull needs a hard chine and a transom that leaves the water cleanly.
Displacement hulls
A displacement hull never gets over its own bow wave. It pushes water aside and closes it back in behind, and its speed is bounded by how fast that wave can travel — which depends only on waterline length. Past that limit drag climbs very steeply for very little extra speed. Motor launches, trawlers and canal boats all work this way.
Choosing Displacement vessel changes three things:
- The shape. The bottom rolls smoothly into the topside instead of breaking at a chine, so there is no deadrise to set. The keel is deepest amidships and rises to both ends.
- The controls. Hull shape offers midship fullness, turn of bilge, rise of floor and forefoot depth in place of the two deadrise sliders.
- The physics. Resistance comes from the Holtrop-Mennen method rather than Savitsky, and trim and porpoising — which describe a hull riding on a pressure cushion — no longer apply.
| Control | What it does |
|---|---|
| Midship fullness | How square the bottom is amidships. This is the section's area coefficient: 0.50 is a triangular V, 0.85 is nearly a box. Fuller carries more load on the same draught but costs drag. |
| Turn of bilge (height) | How far up the hull the bottom rolls into the topside. Lower gives a tighter, harder turn; higher a rounder, softer one. |
| Rise of floor | The slight V at the keel. A few degrees helps the boat track and drains the bilge; zero is a flat floor. |
| Forefoot depth | How far forward the keel stays deep before it lifts to the stem. Deeper grips and tracks; more cut-away turns more easily. |
| Fullness of the ends advanced | How far the wide mid-body carries before it tapers. The strongest lever on the prismatic coefficient. |
| Transom immersion advanced | How much of the transom sits in the water at rest. Some is normal; too much drags a wide wake at cruising speed. |
Under Design speed the wizard shows the Froude number and names the regime — displacement mode, approaching hull speed, above hull speed. Amber means you are asking the hull to go faster than its length really allows.
Cp and Cb are results, not settings
The proposal reports the prismatic and block coefficients the hull actually came out with, because they depend on where the waterline lands, which depends on what you load the boat with. A Cp around 0.55–0.65 is the comfortable range for a motor launch; the chip retitles as it moves: Balanced ends in band, Fine ends or Full ends in amber just outside it, and Very fine / Very full in red beyond Cp 0.50–0.70. It always shows the number it is judging.
2 — Start from a boat
"Pick a boat that's close to what you want — you'll fine-tune it next. The preview on the right updates as you go."
Each preset is a complete set of answers for the steps that follow. Picking one also names the project, if you have not renamed it yourself yet.
The picture on each tile is the hull that preset actually generates, drawn to scale, so the four are directly comparable. There is no waterline on a tile: floating the boat needs the loadout you have not been asked for yet, so a tile shows shape only — the live preview on the right is where the hull gets floated.
| Preset | Length | Beam | Deadrise transom → bow | Good for |
|---|---|---|---|---|
| Sport skiff | 5.5 m | 2.10 m | 14° → 32° | All-round V-bottom runabout. The safe default. |
| Deep-V | 6.0 m | 2.30 m | 20° → 44° | High deadrise — soft ride offshore. Costs fuel and rolls more at rest. |
| Flat utility | 5.0 m | 2.00 m | 6° → 18° | Low deadrise — stable work skiff. Fast on flat water, punishing in chop. |
| Day runabout | 6.0 m | 2.35 m | 16° → 34° | Roomy, drier bow — family day boat. |
3 — Size & use
| Field | Range | What it means |
|---|---|---|
| Project name | — | Free text. Defaults to Untitled hull; renameable later. |
| Length overall | 2.5 – 12 m (18 m for a displacement hull), or your plan cap if lower | How long the boat is, bow to stern. |
| Beam (overall) | 1.4 m up to 3.2 m (5.5 m for a displacement hull), and never more than 0.45 × the length — so a short boat cannot be made wider than it is long. | The boat's widest point, at the gunwale. The waterline sits narrower — the preview shows both. |
| Design speed | 5 – 45 kn (3 – 20 kn for a displacement hull), or your plan cap if lower | The speed the hull is optimised around. Not a top speed — the speed you want it to be good at. |
On the free plan, length is capped at 5 m and speed at 18 kn. When you reach a cap the slider stops and a Max 5 m on your plan · Upgrade hint appears beneath it.
4 — Hull shape
The step that decides how the boat rides. There is an Advanced checkbox in the header that reveals two more controls on a planing hull, and four on a displacement one.
| Control | Range | What it does |
|---|---|---|
| Deadrise at transom | 0 – 30° | The V at the stern. Flatter rides faster on calm water; deeper is softer in chop. |
| Deadrise at bow | 0 – 55° | The V at the front. A deeper bow slices oncoming waves. |
| Freeboard (at rest) | From 0.15 m (0.30 m for a displacement hull) up to the larger of 0.90 m (1.60 m displacement) and 0.16 × the length — the top of the range grows with the boat, so a long hull is not capped at a skiff's freeboard. | Height from the waterline to the gunwale amidships — how dry it rides. See the note below; this one works backwards from the others. |
| Stem (bow profile) | Raked (angled) / Plumb (upright) | Whether the bow leans forward or stands vertical. Raked is the conventional look; plumb buys a little more waterline length for the same overall length. |
| Bow entry fineness advanced | 0.1 – 0.9 | Higher = a finer, sharper bow entry. A fine entry cuts waves better but carries less buoyancy forward, so the bow can bury. |
| Stations advanced | 4 – 40 sections | How many cross-sections the hull is drawn from. This is the same boat either way — more sections just give you finer control over the curves. |
Deadrise is the angle of the bottom measured up from horizontal. Zero is a flat bottom: maximum lift for the least power, very stable at rest, and it will beat you senseless in any chop because there is no wedge to soften the impact. Twenty degrees and up is a deep V: it slices into waves instead of slapping them, at the cost of fuel, and it rolls more when stopped because there is less flat area resisting heel.
Almost every planing boat is warped — finer at the bow, flatter at the transom — which is why you set two values. The bow does the wave-cutting; the stern does the lifting.
5 — Sides
"Flare throws spray down and keeps the boat dry; tumblehome tucks the topsides inward (a classic look, a little less reserve buoyancy). Set the bow and stern separately."
| Control | Range |
|---|---|
| Bow sides | −1.00 to 1.50. Under −0.15 reads tumblehome, over 0.15 reads flared, and the middle is plumb. |
| Stern sides |
Flare forward is the one that matters for staying dry — it is what turns the bow wave down and out instead of letting it come aboard. Flare aft mostly buys you deck space and a bit of reserve buoyancy.
6 — Cockpit optional
Tick Add a cockpit to place a recess in the deck.
- Cockpit length — 0.5 m up to the boat's length less 0.5 m.
- Distance from stern — how far forward of the transom it starts.
- Side inset — from 0.05 m up to a quarter of the beam. How far the cockpit edge sits inboard of the sheer.
Skipping leaves the cockpit off; you can add one at any time from the designer's Parameters tab, with more control than the wizard offers.
7 — Power & load optional
Tick Set the load (otherwise a sensible default is used). This is what determines how deep and how level the boat floats in the preview.
- Engine weight — 0 kg up to 400 kg or 0.60 × L³, whichever is larger, placed near the transom. A big displacement hull needs tonnes, not kilos.
- Fuel + gear — 0 kg up to 300 kg or 0.45 × L³, whichever is larger, placed about a third of the way forward.
- People aboard — 0 – 8, reckoned at ~80 kg each, seated around the helm.
These become real placed objects in the project, so you can drag them around in the Weights modal afterwards rather than being stuck with the wizard's positions.
8 — Material optional
Tick Choose a hull material to pick between Fibreglass (FRP) at about 12 kg/m² and Aluminium at about 24 kg/m². This sets the shell weight, which feeds how the boat floats.
Those are finished-structure figures at the default 6 mm planking, framing and fastenings included. In the designer they become a single hull material in kg/m³ that every part is weighed at, so changing the planking thickness there changes the shell weight with it.
Skipping defaults to fibreglass. Timber scantlings — keel and stem siding and molding — are set later in the designer.
9 — Transom rake optional
Tick Rake the transom and set Transom rake between 0 and 25°. Rake leans the top of the transom aft, pivoting at the keel — the classic reason being to let an outboard tuck in neatly.
Skipping leaves the transom vertical. The designer allows a much wider range (−60 to 60°) if you want something unusual.
10 — Review & create
"Here's your starting hull. Create it to open in the design lab, where you can refine every line."
A recap of everything you chose, then Create project. The project is saved and the designer opens with it loaded.
The proposal preview
The panel on the right, headed Proposal preview. It is not a sketch — each time you stop moving a slider, the app generates the real mesh, solves where it floats and how it trims, and sends the whole thing back. What you see is what you will get.
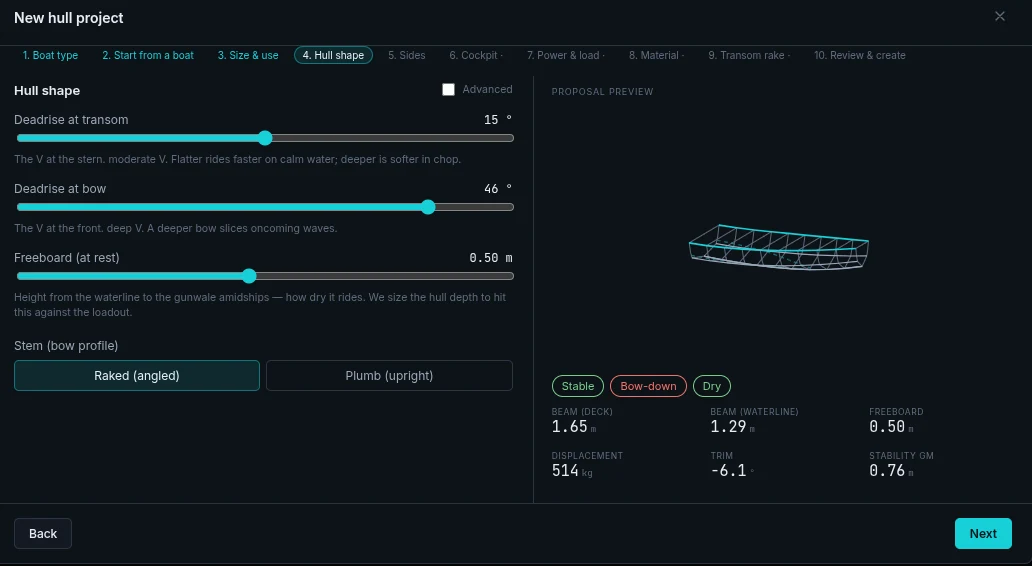
The numbers
| Cell | Meaning |
|---|---|
| Beam (deck) | Width at the gunwale — the number you set. |
| Beam (waterline) | Width where the boat actually meets the water. Always narrower on a V-hull, and this is the one that drives stability and resistance. |
| Freeboard | What you actually got, after the depth solve. |
| Displacement | What the boat weighs, all in. |
| Trim | How far off level it sits, in degrees. |
| Stability GM | Metacentric height — see Reading the numbers. |
The verdict chips
| Chip | Green | Amber | Red |
|---|---|---|---|
| Stability | Stable — GM between 0.20 and 1.25 × the waterline beam | Stiff (snappy roll) — GM above 1.25 × the waterline beam | Tender (tippy) — GM under 0.20 × the waterline beam |
| Trim | Sits level — under 2° | Slightly bow-up / bow-down — 2–5° | Bow-up / Bow-down — 5° or more |
| Freeboard | Dry — 3.3% of the length or more | Low freeboard — between 2.0% and 3.3% of the length | Water could come aboard — under 2.0% of the length |
These are deliberately blunt rules of thumb for a small planing boat, meant to stop you creating something obviously wrong. They are not a stability assessment and they are not a substitute for the full hydrostatics in the designer.
If a slider produces a shape the app cannot float at all, the panel says Preview unavailable with the reason. Back the offending slider off.
One thing that surprises people
Your other choices — cockpit, weights, material, transom rake — are stored as project settings and remain editable in the designer.