Your first hull
Start to finish: an account, a generated hull, a sanity check on the numbers, one optimiser run, and a file you can open in CAD. About twenty minutes at a comfortable pace.
The walkthrough
-
Get in
Hull is in closed beta, so accounts are invite-only: email hull@drpira.se to apply, and /signup will tell you the same thing until sign-ups reopen.
We reply with a personal invite link. Open it and the sign-up form appears with your address already filled in — it is fixed, because the invite is bound to it. Pick a name and a password and the account is yours. The link works once and lasts 14 days; if it goes stale, ask and we will send another.
Signing in drops you straight into your projects library — the page that lists every hull you own, with a thumbnail and its headline numbers on each card.
Each thumbnail is drawn from that design's own saved hull, to scale, so the card shows the actual boat rather than a generic picture: card view gives you the wireframe from the bow quarter with the waterline dashed in, list view the deck outline seen from above. A design whose geometry cannot be drawn yet shows a dashed rule instead of a boat.
A new account gets its own workspace. That is the container your projects live in and the thing plans apply to; you can invite people into it later from Settings.
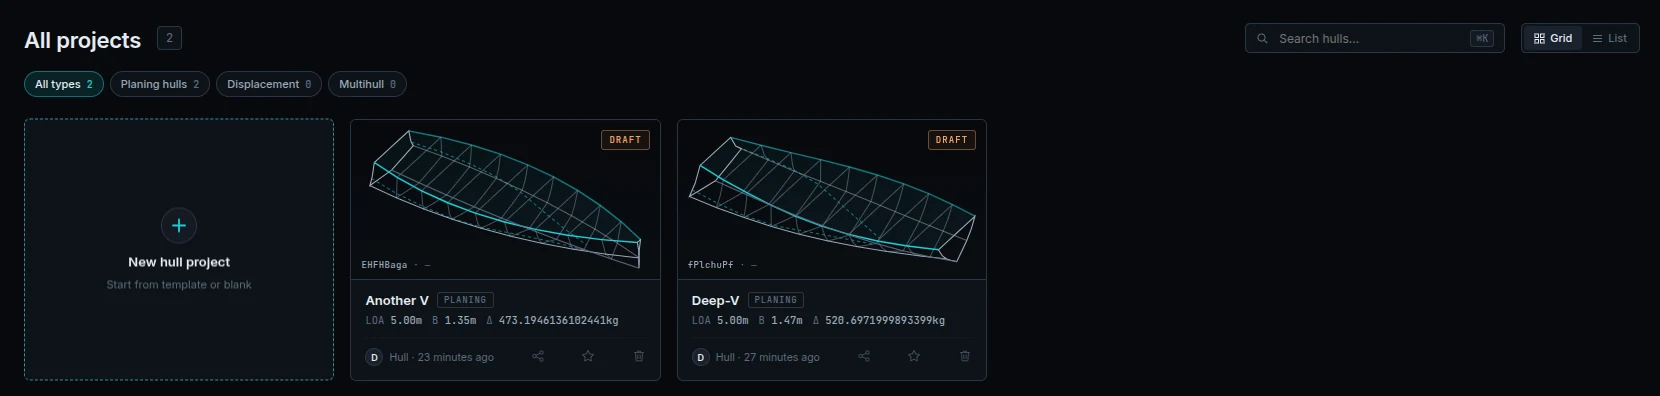
The projects library. Each card is drawn from that design's own saved hull, so the thumbnail is the actual boat. -
Click New project
Top right. The wizard opens over the page, with a live preview panel on the right. It will not close if you click the backdrop — only the ✕ or Cancel — so you cannot lose your answers by misclicking.
-
Answer the questions
Ten steps, four of them optional. The first two matter most: Boat type (pick Planing hull or Displacement vessel) and Start from a boat, where you choose the archetype closest to what you want.
For a first hull, take Sport skiff, set the length and beam you have in mind, and click through the rest on their defaults. Every optional step has a Skip button and a sensible fallback.
-
Read the preview before you commit
Each time you move a slider the app generates the mesh, floats it against the loadout and sends back the result — so the wireframe, the dashed waterline and the numbers underneath all describe the boat you are about to create, not an illustration of one.
Three chips give you the plain-language verdict:
Chip Good Watch out Stability Stable Tender (tippy) — rolls easily. Stiff (snappy roll) — rights so hard it is uncomfortable. Trim Sits level Bow-up or Bow-down — the load is too far aft or too far forward. Freeboard Dry Low freeboard, or Water could come aboard — the boat is floating too deep for its depth. Do not chase perfection here. Anything that is not red is a fine starting point — the designer is where you fix things properly.
-
Click Create project
The design lab opens with your hull loaded. This is the app proper: four viewports in the middle, your stations on the left, and eight tabs of tools on the right.
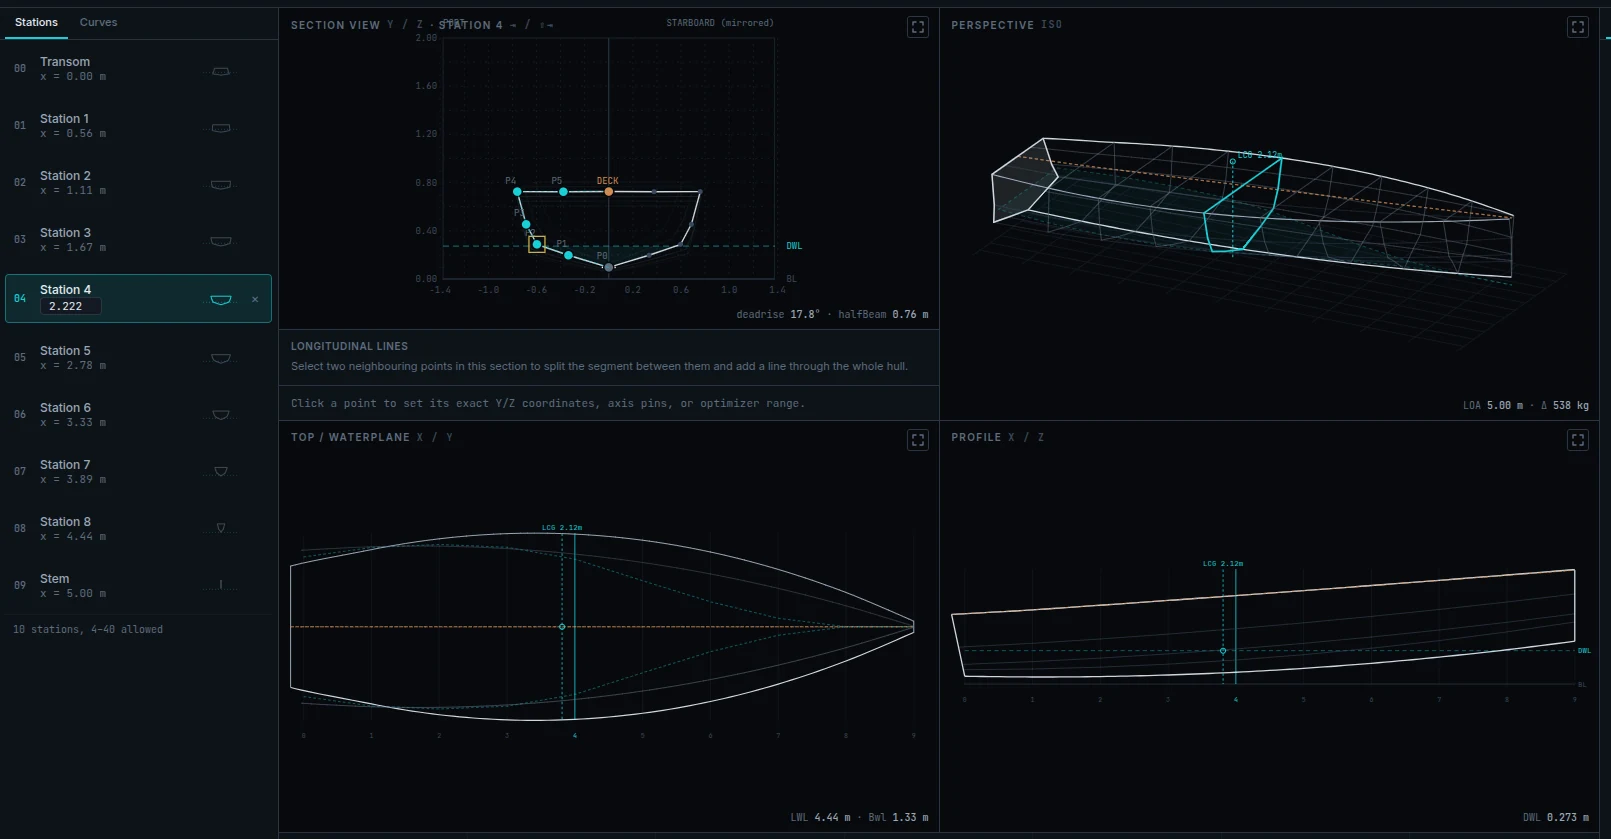
The design lab with a hull loaded: stations on the left, four viewports in the middle, the tool tabs on the right. The readout under each viewport is live. Take a moment to orbit the PERSPECTIVE view by dragging in it, and click along a few stations in the list on the left to see the sections change. Nothing you do by looking can break anything. The full tour →
-
Check that it floats the way you meant it to
Open the Hydrostatics tab on the right. There are a lot of rows; on a first pass you only need four.
Row What to look for Displacement vs Target mass These should agree. Displacement is what the hull actually lifts at the current waterline; target mass is what you told the app the boat weighs. If they differ, the waterline has not been resolved against your loadout yet — fix it in step 7. Trim (at rest) Near zero is level. A degree or two is normal and usually fine. Five degrees means the weight is badly placed fore-and-aft. GM Judged against the boat’s waterline beam, not as bare metres — a wide hull earns a bigger GM without being any stiffer. Below 0.20 × the beam it is tippy; far above and the roll gets uncomfortably quick. Freeboard (mid) How much hull is above water amidships. Under about 0.2 m on a small boat is getting wet. What is the waterline?A boat floats where the weight of the water it pushes aside equals the weight of the boat. That level is the waterline — DWL in the app, for "design waterline". It is not something you draw; it is solved for, from the shape of the hull and everything loaded into it.
So a heavier boat floats deeper, and the numbers describing the underwater part of the hull — wetted surface, waterline length, stability — all move with it. This is why the weights matter so much: change what is aboard and you change the boat's hydrostatics without touching the shape at all.
What is GM, and why does it decide whether a boat is comfortable?GM is the metacentric height: the distance between the boat's centre of gravity and the point it effectively pivots about when it heels. It is the single best one-number measure of initial stability.
Big GM means a stiff boat — it resists heeling hard and snaps back fast, which feels jerky and is tiring in a seaway. Small GM means a tender boat — it leans easily and rolls slowly, which feels unnervingly loose and, taken far enough, is dangerous. You want the middle. Beam raises GM quickly; weight carried high lowers it.
-
Set the real load
Click Weights in the top bar. This is where the boat's mass actually comes from, and getting it roughly right early saves re-reading every other number later.
Two contributions:
- The shell. A density in kg per square metre times the hull's surface area. The panel suggests 8–14 kg/m² for fibreglass and 18–28 kg/m² for aluminium.
- Placed objects. Everything else — engine, fuel, batteries, people. Click empty space on the plan view to add one, then drag it to position and set its mass and height.
As you move things, the app re-solves where the boat floats and shows you Expected DWL and Trim · freeboard at the bottom. Watch the LCG and LCB markers on the plan view: when they line up vertically, the boat sits level.
Trim, and why LCG and LCB want to be in the same placeLCG is the fore-and-aft centre of everything the boat weighs. LCB is the fore-and-aft centre of the water it displaces. Gravity pulls down at one, buoyancy pushes up at the other, and if they are not in line the pair form a couple that rotates the boat until they are.
That rotation is trim. A boat trimmed bow-down steers badly and buries its forefoot; trimmed too far bow-up it slams and loses visibility. You do not fix trim by adjusting the waterline — you fix it by moving weight, or by changing the shape so the buoyancy moves instead.
-
Run the optimiser once
Open the Optimizer tab. Leave the target on Balanced, set Design speed to the speed you actually care about, and press Run optimizer.
It takes a few seconds to a couple of minutes. Watch the Solver Log — it narrates what it is doing and, at the end, what it achieved. When it finishes, compare the Total Resistance readout with what it was before.
You cannot lose your hull here. If the solver fails to converge, hits its iteration limit, or finds your constraints impossible, it puts the original mesh back exactly as it was and tells you so in the log. A failed run costs you time, never work.The important thing to understand before your second run: the optimiser only moves points you leave free. Pin a point, or give it a narrow range, and it stays put. That is the real control surface. How to drive it →
-
Get it out
Open the Export tab and pick a format:
- Building it? Download offsets (.csv) gives you a table of coordinates to loft from, and the keel & stem schedule gives you the backbone.
- Taking it into CAD? STEP solid (.stp) is the one you want — it opens as editable geometry in FreeCAD and everything else.
- Just want to look at it? OBJ mesh (.obj) opens in anything that can show a 3D model.
A few things worth knowing early
Your work saves itself
There is no save button. Every change is written back about a second after you stop making it, and the pill next to the project name shows saving… then saved. After an optimiser run the save happens immediately rather than waiting, so a crash cannot cost you a solve.
If the connection drops you get a connection lost — retrying… your changes are kept banner and the app keeps trying in the background. Keep working; it catches up.
Publish a version when you reach something you like
The Versions tab freezes the hull exactly as it is into a numbered, read-only snapshot. Do this before any big experiment. You can always open an old version, or copy it back over your working hull — and doing so snapshots your current state first, so that is not destructive either.
Deleting is not deleting
Delete project moves it to Archived in the sidebar. Nothing is erased.